This game doesn’t have the small fairy fountains that Ocarina did, but I’ve found that the owl statues always have a fairy in a nearby pot or bush for Link to grab, along with arrows, bombs, and a magic refill. It’s a quick way to restock on some of the most important consumables, so of course I figure this out now that I’m trying to empty Link’s bank account and buying arrows and bombs and such in town is a nice way to spend money. Anyway, Link restocks, calls the turtle, and hookshots onto its back. During the turtle ride, the Gerudo pirates make their own attempt at approaching the temple, only to get swept up and blown away by the tornado swirling around it. The turtle safely delivers Link, who cutely waves goodbye as he prepares to head into the temple. (He does the same wave as the great fairies go back into their fountains.)
The Great Bay Temple has none of the things that annoyed me about Ocarina’s Water Temple, and yet it manages to be just as frustrating an experience. I wonder if part of the reason I hated putting on/taking off the iron boots so much is that I wasn’t used to it, having only gotten the iron boots in the minidungeon immediately before the Water Temple; by now swapping out masks is close to second nature. The biggest frustration for me here was the main room with the swirling currents; it could be serious chore to get into the right gateway, and the only thing to do if Link went in the wrong one is work the way through the next several rooms against respawning enemies. Like I said, without the beavers’ swimming challenge actually teaching me the swimming controls, I don’t know that I could have done this. As it is, the first two dungeons I’m pretty sure I could have completed in a normal cycle without the Inverted Song of Time (maybe not in time to get my sword reforged twice), but this one might have gotten pretty dicey.
A lot of that time was spent fighting the first miniboss, Wart. Wart’s a boss in the tradition of patras or Arrghus or Barinade: a central eye surrounded by like a hundred blobs of goo. As such, the idea seems to be to knock the blobs of goo off of it and kill them to reveal the core eye, and I tried it patiently with fire arrows, but like Odolwa it was taking too long so I had Link go in with nothing but nothing but his sword and his lack of caring if there’s a better way. This went pretty quickly, and kicked off phase two, in which Wart zooms around the arena ramming into Link. This was also hard, because it didn’t leave just a whole lot of time to get an arrow shot lined up. This was probably the fight where I took the most damage thus far, even worse than the iron knuckles in the graveyard.
The treasure in the dungeon is the ice arrows, which actually have a use in this game. They can freeze enemies to use as platforms, or when there’s no enemies to freeze, freeze patches of water. They’re also needed against the second miniboss, gekko, who summons a blob of ooze that he tries to smash onto Link but breaks apart if frozen, leaving the gekko vulnerable. The gekko turns into a frog when defeated, and now it’s time to start rounding them up. Link speaks to it wearing Don Gero’s mask, and it promises to return to the mountains come spring.
Halfway through the dungeon, Link needs to reverse the current in the central room by changing which pipes are spinning a giant water wheel, and this leads to the final boss, Gyorg, a gargantuan masked fish. This is kind of an underwhelming fight. He’s dangerous, no doubt, doing big damage when he catches Link before he can get back onto the central platform and his jumps make it hard to stay on that platform if Link’s near the edge (which he needs to be, to shoot Gyorg). But the routine is simple: stand on the platform, shoot Gyorg with an arrow, put on the Zora mask, float down to the bottom, shock him, get out of the water before Link gets eaten. I had more trouble with hitting the wrong button (usually rolling into the water rather than shooting an arrow, which is decidedly Not Ideal) than anything Gyorg did.
Link and Tatl get to meet with the giants again, and Tatl’s demanding that they help. Their response is “Save our friend,” which Tatl takes to mean save the fourth from the canyon dungeon. For rounding up stray fairies, the great fairy in the bay area awards Link with halved damage. Lulu’s voice is back, so the zora band is back on for the Clock Town festival performance, and Link gets to join in as they rehearse the song the bandleader stole from Mikau, Link, and one of the bandmates.
With the pirates’ presence reduced and the waters cleaned up, the fisherman has set up a jumping game that requires riding an automatic boat and hookshotting off to a group of islands. This is a fun and easy game: five islands in an X shape, with torches on the outer islands, and Link has to jump to the island with the lit torch and back. I do wish if the camera were fixed in an odd place, it would be one where I could see all four torches at once. Getting 20 earns a heart piece.
There are four other frogs: one already in the gathering place, one in the swamp, one in Clock Town’s laundry pool, and one left behind after defeating a gekko in Woodfall Temple. Once Link defeats Goht to bring spring back to the mountains, he’s greeted by the reunited frog choir, and thankfully doesn’t have to do anything else after having to visit three different dungeons to get them back together. For his help, he gets a heart piece. While the mountains are thawed, Link can also get a heart piece in the water surrounding the islands leading into Goron Village.
Next: Finishing the Bombers’ Notebook.
Friday, August 31, 2018
Wednesday, August 29, 2018
Majora's Mask: Heart Piece Collection
The scarecrow in the astronomy tower has a counterpart in the town’s trading post. In addition to teaching Link tricks he can do with the Song of Time, they respond if Link shows his ocarina and encourage him to play a melody for them. I chose one of the unused songs from Ocarina, Saria’s Song (extended by two notes), and the scarecrow promised to show up if Link played the melody. There are two useful places I found to play it: one on the road to Snowhead, which also takes the Lens of Truth to get, and one near where the pirates’ fortress is, which also requires riding a magic bean plant (which can be grown quickly with the Song of Storms). There’s heart pieces in it for both.
On the way to the beach is a boulder that can be exploded to reveal a hole. In the hole is a pond, and by sinking to the bottom, Link can get another heart piece here.
There are two aquaria in the lab, one to hatch zora eggs and the other with a couple big fish that Tatl notes look hungry. (I didn’t notice the egg aquarium at first, so I spent a bunch of time trying to drop the eggs in to get eaten. Fortunately, it wouldn’t let me, and my frustration eventually led me to the right place.) The hungry fish want Link to bottle fish and drop them in for him. After four, they reward him with another heart piece.
The next stop is Zora Cape, where a couple zoras have set up a pot-breaking game, as if Link needs the incentive. Actually, this one has a bit of a disincentive, threatening to fine people who recklessly break the pots. In other words, it costs 10 rupees to play, but that’s taken after the game is played, not before, so if you come to this broke (or go broke trying to win), there’s no punishment for failure. The pots are set up in a W shape, and there’s a spot and throwing angle where if Zora Link throws at the center pot with the double boomerangs, they’ll smash the other four pots in their return arc. The setup allows for small-scale corrections to Link’s starting position/angle. The reward for this is 100 rupees, minus the pot replacement charge – for the one good throw only; he doesn’t remember all the other times. If I still needed rupees for the bank, this would be the way to make them now.
The last point of interest for this collection is the waterfall at the end of the cape. Under the waterfall is a like like that drops a heart piece when killed. Above the waterfall are a series of ledges with single trees on, which means Link needs to find the lowest one and make his ascent with the hookshot. Finally, he enters a cave and finds a beaver, who doesn’t want to talk to Link. Link presses the issue by putting on the Zora Mask and pursuing the beaver underwater.
The beaver knows Link’s after a bottle, and promises one if Link can beat his swimming challenge. Said challenge involves following the beaver through a river and passing through all of the rings, in order. This gave me fits at first, because I hadn’t gotten a grip on the swimming controls, so if I moved fast enough to make it to the end of the course, I didn’t have enough control to pass through the rings, and if I took my time on the rings, I didn’t have enough to make it through all of them. It was a happy accident that let me stumble on the fact that if I held down the swim button, Link would continually be in swim mode and could be guided with the control stick. So I’m really glad for this minigame, because not knowing how to swim would probably have made the next dungeon miserable [1]. Once Link beat it, the beaver summoned his older brother for help. The brother also challenges Link, and his race has more rings and a trickier path. Once that’s done, the beavers give Link the promised bottle. Link can challenge them again, and after making it through both courses with a stricter time limit, gets a heart piece.
If Link stops the thief from stealing the bomb bags on the first night, the Curiosity Shop owner has a mask on the third night that won’t let the wearer fall asleep. It was apparently used as a torture device, but Link has a different use for it. He starts a new cycle and goes to the inn. The innkeeper’s grandmother mistakes him for her son, and she loves to tell stories, but Link doesn’t find them interesting and falls asleep when she tells them. The All-Night Mask lets him stay up through the stories, and she awards him “candy” (heart pieces) for listening so well. The stories seem to be about the guardians/giants and… the Skull Kid? If so, he’s really old.
Now it’s time for the temple; the stories already took up half a day, so Link resets time to have a fresh cycle.
Next: What is it about water dungeons?
[1] Miserabler.
On the way to the beach is a boulder that can be exploded to reveal a hole. In the hole is a pond, and by sinking to the bottom, Link can get another heart piece here.
There are two aquaria in the lab, one to hatch zora eggs and the other with a couple big fish that Tatl notes look hungry. (I didn’t notice the egg aquarium at first, so I spent a bunch of time trying to drop the eggs in to get eaten. Fortunately, it wouldn’t let me, and my frustration eventually led me to the right place.) The hungry fish want Link to bottle fish and drop them in for him. After four, they reward him with another heart piece.
The next stop is Zora Cape, where a couple zoras have set up a pot-breaking game, as if Link needs the incentive. Actually, this one has a bit of a disincentive, threatening to fine people who recklessly break the pots. In other words, it costs 10 rupees to play, but that’s taken after the game is played, not before, so if you come to this broke (or go broke trying to win), there’s no punishment for failure. The pots are set up in a W shape, and there’s a spot and throwing angle where if Zora Link throws at the center pot with the double boomerangs, they’ll smash the other four pots in their return arc. The setup allows for small-scale corrections to Link’s starting position/angle. The reward for this is 100 rupees, minus the pot replacement charge – for the one good throw only; he doesn’t remember all the other times. If I still needed rupees for the bank, this would be the way to make them now.
The last point of interest for this collection is the waterfall at the end of the cape. Under the waterfall is a like like that drops a heart piece when killed. Above the waterfall are a series of ledges with single trees on, which means Link needs to find the lowest one and make his ascent with the hookshot. Finally, he enters a cave and finds a beaver, who doesn’t want to talk to Link. Link presses the issue by putting on the Zora Mask and pursuing the beaver underwater.
The beaver knows Link’s after a bottle, and promises one if Link can beat his swimming challenge. Said challenge involves following the beaver through a river and passing through all of the rings, in order. This gave me fits at first, because I hadn’t gotten a grip on the swimming controls, so if I moved fast enough to make it to the end of the course, I didn’t have enough control to pass through the rings, and if I took my time on the rings, I didn’t have enough to make it through all of them. It was a happy accident that let me stumble on the fact that if I held down the swim button, Link would continually be in swim mode and could be guided with the control stick. So I’m really glad for this minigame, because not knowing how to swim would probably have made the next dungeon miserable [1]. Once Link beat it, the beaver summoned his older brother for help. The brother also challenges Link, and his race has more rings and a trickier path. Once that’s done, the beavers give Link the promised bottle. Link can challenge them again, and after making it through both courses with a stricter time limit, gets a heart piece.
If Link stops the thief from stealing the bomb bags on the first night, the Curiosity Shop owner has a mask on the third night that won’t let the wearer fall asleep. It was apparently used as a torture device, but Link has a different use for it. He starts a new cycle and goes to the inn. The innkeeper’s grandmother mistakes him for her son, and she loves to tell stories, but Link doesn’t find them interesting and falls asleep when she tells them. The All-Night Mask lets him stay up through the stories, and she awards him “candy” (heart pieces) for listening so well. The stories seem to be about the guardians/giants and… the Skull Kid? If so, he’s really old.
Now it’s time for the temple; the stories already took up half a day, so Link resets time to have a fresh cycle.
Next: What is it about water dungeons?
[1] Miserabler.

Monday, August 27, 2018
Majora's Mask: Last Request
So, it turns out the reason I couldn’t find anything to do in Great Bay Coast is because I didn’t look to the south. There are two houses there. One seems to be abandoned but the name indicates it’s got some eight-legged inhabitants, so that can wait until I’ve quested some. The other is a fisherman’s hut. Apparently the water’s gone hot and murky, and that’s not good for anyone. He says he saw a zora dying out in the water. He’s also got a seahorse who asks Link for help; the fisherman says he’ll let Link have the seahorse in exchange for a picture of the pirates from the fortress. Right, that’s not a creepy request, but I’ve got a feeling I’ve got to do it anyway.
Out in the bay, Tatl sees the seagulls around the dying zora, Mikau, and Link goes out and pushes him to shore. When Link talks to him, it’s plain he’s dying, with just enough strength to get up and perform one final guitar solo while singing about how he was mortally injured, as is customary. The basic story: the singer in his band laid some eggs that were stolen by the Gerudo pirates, and so he went to try to get them back. He failed and now he can’t even die in peace. The song of healing works wonders on his soul, letting him move on and leave behind the zora mask, which will let Link navigate the waters a little easier.
The pirate fortress, like the Gerudo fortress of Ocarina of Time, is largely a stealth mission. The biggest difference: Link has the stone mask from the invisible guard, which makes him invisible to the pirates, and so he can sneak by them. Or, say, up close enough to snap a picture. Link can overhear a conversation between two of the pirates: they have four of the eggs, and three more are lost in the murky waters where they were beset by sea snakes. There are a few scripted encounters with pirates who can see through the stone mask’s illusion; usually one right before each aquarium where an egg is. In addition to the four eggs, Link finds the hookshot and a piece of heart. Then he warps back to the research center, drops the eggs in the hatching aquarium, and sets out to find the other three.
Now Link can tackle the skulltula house. There’s no one to greet Link here, and the building is falling into disrepair. Like the previous skulltula house, there are 30 of them spread throughout. This is mostly a workout for the hookshot and fire arrows, two tools Link didn’t have when he took on the swamp house. He also has to knock some loose from the ceiling with a goron smash, and goron form is needed to roll out of the basement. There are also a bunch of stalchildren here who have researched the solution to a puzzle, which they tell Link if he’s wearing the captain’s mask. He can put the solution in place to get a piece of heart. With the skulltulas all gone, when Link leaves the basement he meets a guy looking for a place to take refuge (from the moon, I’m guessing), who gives Link the second wallet upgrade. Now he can take 500 at a time out of the bank account, which will probably give the banker an aneurysm.
The fisherman gets his picture, so Link gets the seahorse. He take the seahorse out to the entrance to the Pinnacle Rock area, and lets it go and follows it through a signpost maze to a deep chasm with sea snakes living in caves. Three of the snakes are guarding the last three zora eggs, and if Link kills all eight, the seahorse reunites with its mate, and they give Link a heart piece as thanks. Link takes the eggs back to the lab, where when all seven eggs are in the aquarium, they hatch, and in a really clever scene, the tadpoles shape themselves like music notes in front of the background which looks like a staff. The scientist realizes what it is, and zora Link gets out his guitar and plays the song suggested by the notes.
The scentist suggests playing the music for the mother of the eggs, so Link sets out for Zora Hall. Three of Mikau’s bandmates are practicing in their rooms, playing songs from previous Zelda games (the dungeon and game over themes from The Legend of Zelda, and the cave theme from A Link to the Past). Link can find Mikau’s diary, which talks about jam sessions he played with Japas. Then the two get together for another jam session, and Link plays the notes he read to complete the song. The zoras all excitedly listen in, but the bandleader seems uninterested when Link plays it for him. However, if Link takes off the mask and plays the song on the ocarina, the bandleader eagerly steals credit for the song and gives Link a heart piece to ensure his silence. In Lulu’s room there’s a business scrub wanting to move somewhere less wet.
Lulu herself is outside, staring out at the ocean. Link plays the New Wave Bossa Nova for her, which summons a turtle from the deeps who offers Link a ride to the Great Bay Temple. There’s also an owl statue here. I want a new cycle for a dungeon, and the zora mask and hookshot have opened up new opportunities that’ll take some time to explore, but there’s two things to wrap up this cycle. First, Moon’s Tear, city flower, swamp flower, mountain flower, ocean flower, heart piece.
Second, back at the Milk Bar in Clock Town, Link can run a sound check with the zora band’s manager. Gorman, the theater troupe’s leader and brother of the asshats harassing Cremia, complains about the noise. However, after Link’s done the sound check in each of his four forms, Gorman’s reduced to tears because of memories associated with the song and gives Link his mask. The song’s called “Ballad of the Wind Fish,” but it bears no resemblance to the song from Link’s Awakening.
And now it’s time to start the next cycle.
Next: Lots and lots of sidequests.
Out in the bay, Tatl sees the seagulls around the dying zora, Mikau, and Link goes out and pushes him to shore. When Link talks to him, it’s plain he’s dying, with just enough strength to get up and perform one final guitar solo while singing about how he was mortally injured, as is customary. The basic story: the singer in his band laid some eggs that were stolen by the Gerudo pirates, and so he went to try to get them back. He failed and now he can’t even die in peace. The song of healing works wonders on his soul, letting him move on and leave behind the zora mask, which will let Link navigate the waters a little easier.
The pirate fortress, like the Gerudo fortress of Ocarina of Time, is largely a stealth mission. The biggest difference: Link has the stone mask from the invisible guard, which makes him invisible to the pirates, and so he can sneak by them. Or, say, up close enough to snap a picture. Link can overhear a conversation between two of the pirates: they have four of the eggs, and three more are lost in the murky waters where they were beset by sea snakes. There are a few scripted encounters with pirates who can see through the stone mask’s illusion; usually one right before each aquarium where an egg is. In addition to the four eggs, Link finds the hookshot and a piece of heart. Then he warps back to the research center, drops the eggs in the hatching aquarium, and sets out to find the other three.
Now Link can tackle the skulltula house. There’s no one to greet Link here, and the building is falling into disrepair. Like the previous skulltula house, there are 30 of them spread throughout. This is mostly a workout for the hookshot and fire arrows, two tools Link didn’t have when he took on the swamp house. He also has to knock some loose from the ceiling with a goron smash, and goron form is needed to roll out of the basement. There are also a bunch of stalchildren here who have researched the solution to a puzzle, which they tell Link if he’s wearing the captain’s mask. He can put the solution in place to get a piece of heart. With the skulltulas all gone, when Link leaves the basement he meets a guy looking for a place to take refuge (from the moon, I’m guessing), who gives Link the second wallet upgrade. Now he can take 500 at a time out of the bank account, which will probably give the banker an aneurysm.
The fisherman gets his picture, so Link gets the seahorse. He take the seahorse out to the entrance to the Pinnacle Rock area, and lets it go and follows it through a signpost maze to a deep chasm with sea snakes living in caves. Three of the snakes are guarding the last three zora eggs, and if Link kills all eight, the seahorse reunites with its mate, and they give Link a heart piece as thanks. Link takes the eggs back to the lab, where when all seven eggs are in the aquarium, they hatch, and in a really clever scene, the tadpoles shape themselves like music notes in front of the background which looks like a staff. The scientist realizes what it is, and zora Link gets out his guitar and plays the song suggested by the notes.
The scentist suggests playing the music for the mother of the eggs, so Link sets out for Zora Hall. Three of Mikau’s bandmates are practicing in their rooms, playing songs from previous Zelda games (the dungeon and game over themes from The Legend of Zelda, and the cave theme from A Link to the Past). Link can find Mikau’s diary, which talks about jam sessions he played with Japas. Then the two get together for another jam session, and Link plays the notes he read to complete the song. The zoras all excitedly listen in, but the bandleader seems uninterested when Link plays it for him. However, if Link takes off the mask and plays the song on the ocarina, the bandleader eagerly steals credit for the song and gives Link a heart piece to ensure his silence. In Lulu’s room there’s a business scrub wanting to move somewhere less wet.
Lulu herself is outside, staring out at the ocean. Link plays the New Wave Bossa Nova for her, which summons a turtle from the deeps who offers Link a ride to the Great Bay Temple. There’s also an owl statue here. I want a new cycle for a dungeon, and the zora mask and hookshot have opened up new opportunities that’ll take some time to explore, but there’s two things to wrap up this cycle. First, Moon’s Tear, city flower, swamp flower, mountain flower, ocean flower, heart piece.
Second, back at the Milk Bar in Clock Town, Link can run a sound check with the zora band’s manager. Gorman, the theater troupe’s leader and brother of the asshats harassing Cremia, complains about the noise. However, after Link’s done the sound check in each of his four forms, Gorman’s reduced to tears because of memories associated with the song and gives Link his mask. The song’s called “Ballad of the Wind Fish,” but it bears no resemblance to the song from Link’s Awakening.
And now it’s time to start the next cycle.
Next: Lots and lots of sidequests.
Saturday, August 25, 2018
Majora's Mask: Link in Black
Tatl says the next destination should be the ocean dungeon to the east. This is blocked by a fence, which Tatl says Link could jump if he had a horse before having the decency to remember why he doesn’t have a horse. Except Link and Tatl know where the horse is, so it’s time to find a way to convince Cremia and Romani to give her back. There’s a goron in the town shop who sells powder kegs, so Link can blow up the giant boulder blocking Romani Ranch. The man who was hacking at it is annoyed at Link’s intervention, because he doesn’t get to spend two days of back-breaking labor hacking a path through the rock, but decides as long as the path is clear, he’s cool with it. When Link arrives at the ranch, whatever happened to Romani hasn’t yet, and she’s practicing archery near the barn.
Romani explains why she’s training: every year as the festival approaches in Clock Town, aliens (the game calls them ghosts, and they look like poes, but it’s aliens) come to the ranch and steal the cows. This is so out of nowhere that it’s hard not to laugh, but two things make this sidequest work. First, we know the consequences if Link fails. The aliens do something to Romani that leaves her an empty shell, and her sister blames herself for what happened. Second, although it’s ridiculous, it’s played completely straight, so it can be taken seriously. After Link does a quick round of riding the horse around the ranch popping balloons to prove he’s an able helper, Romani teaches him Epona’s song, allowing him to summon Epona (I guess it is her!) from anywhere. She tells him to be back by 2:00 for the alien fight.
There’s a lot of time left before then, so Link and Epona leave the ranch to go exploring. The first stop is the Gorman Brothers’ race track, just off the Milk Road. They make fun of Epona and challenge Link to a race. To be honest, they’re not terribly good at racing, but the one thing they do really well is get in Link’s way. If he’s not way ahead coming over the final obstacles, one brother charges in out of nowhere at an angle that can only be meant to block Link’s progress while his brother sweeps out to the lead. With the bank maxed out and the takkuri right there, the money’s not an issue, but it’s frustrating to come so close and lose and have to do it again. When Link finally beats them, they try to figure out what to give him and eventually settle on a mask.
I’ve still got a lot of time, so let’s go to the ocean and look around. There’s actually not much here; it says don’t swim out to the building, but nothing stops Link if he does, so he can get out there and thwack an owl statue, shoot down Tingle and wish for ear plugs and buy maps, and visit the laboratory inside where the scientist is concerned about a late delivery of zora eggs. Up to the north there’s mentions of a pirate fortress.
I’m probably not going to make it to the dungeon this cycle anyway, so I decide to let the pirate fortress wait for another cycle and see what lies to the east. There are some fences Epona can jump over, but then a giant cliff bars the way. There’s some interesting stuff here: a guard who can only be seen with the Lens of Truth and needs healing, and the graveyard is apparently watched over by a giant sleeping stalfos. Link wakes up the stalfos and chases him down, which makes the stalfos surrender and leave command of his followers to Link. Each night, Link can approach groups of stalfos in the graveyard, open a grave, complete a puzzle, fight a miniboss, and get a reward. The first day’s miniboss is an iron knuckle, which probably means I’m not supposed to be out here yet because fighting that on 11 hearts is mean. After it’s dead, Flat, one of the royal composer ghosts, comes to Link. He says Sharp sold his soul to the devil, and teaches Link a song that represents his anger and sadness over the betrayal, the Song of Storms.
Okay, now it’s time for Link to put on his black suit and go back to the ranch. I don’t know why the game had Link practice alien hunting with Epona, because it’s frankly easier to put on the bunny hood, follow the dog around on foot, kill all the aliens Link can see, and hold out until the break of dawn. Dawn comes, the aliens all poof, and Romani calls him “little hero” and gives him a bottle of milk, then sneaks back to the house to go to bed before Cremia catches her. Cremia’s making a milk run to Clock Town that night, and invites Link to come along. It’s a good thing he does, because the Gorman Brothers put a fence in her way, forcing her to take less safe paths to town, and then ride after her wagon trying to break her jars of milk. Link keeps them at bay enough to stop all the milk from being destroyed, and Cremia rewards him with a mask that lets him visit the milk bar in town. There doesn’t seem to be much interesting here just yet, but Link can buy a special milk that will leave his magic meter maxed out until he resets time.
Now it’s back to the graveyard, stopping en route to heal the invisible guard and receive his mask. The second night’s puzzle involves the Lens of Truth, and after another iron knuckle fight, Link gets a heart piece. The third night Link helps Dampé summon a poe. This puzzle is terrible, because Dampé is so goddamn stupid. Okay, I get he can only follow the light of the fairy. But if I lose Z-targeting on him, does he keep going the way he was? Stop until Tatl comes back? No, of course not. He wanders off in a “random” direction which always seems to be opposite the way Link was trying to drag him. Oh, and there’s a wall master, and if it catches Link, it resets the puzzle. Summoning and killing the poe rewards a bottle, which is nice.
And then it’s reboot time.
Next: Trespassing on their private pirate property.
Romani explains why she’s training: every year as the festival approaches in Clock Town, aliens (the game calls them ghosts, and they look like poes, but it’s aliens) come to the ranch and steal the cows. This is so out of nowhere that it’s hard not to laugh, but two things make this sidequest work. First, we know the consequences if Link fails. The aliens do something to Romani that leaves her an empty shell, and her sister blames herself for what happened. Second, although it’s ridiculous, it’s played completely straight, so it can be taken seriously. After Link does a quick round of riding the horse around the ranch popping balloons to prove he’s an able helper, Romani teaches him Epona’s song, allowing him to summon Epona (I guess it is her!) from anywhere. She tells him to be back by 2:00 for the alien fight.
There’s a lot of time left before then, so Link and Epona leave the ranch to go exploring. The first stop is the Gorman Brothers’ race track, just off the Milk Road. They make fun of Epona and challenge Link to a race. To be honest, they’re not terribly good at racing, but the one thing they do really well is get in Link’s way. If he’s not way ahead coming over the final obstacles, one brother charges in out of nowhere at an angle that can only be meant to block Link’s progress while his brother sweeps out to the lead. With the bank maxed out and the takkuri right there, the money’s not an issue, but it’s frustrating to come so close and lose and have to do it again. When Link finally beats them, they try to figure out what to give him and eventually settle on a mask.
I’ve still got a lot of time, so let’s go to the ocean and look around. There’s actually not much here; it says don’t swim out to the building, but nothing stops Link if he does, so he can get out there and thwack an owl statue, shoot down Tingle and wish for ear plugs and buy maps, and visit the laboratory inside where the scientist is concerned about a late delivery of zora eggs. Up to the north there’s mentions of a pirate fortress.
I’m probably not going to make it to the dungeon this cycle anyway, so I decide to let the pirate fortress wait for another cycle and see what lies to the east. There are some fences Epona can jump over, but then a giant cliff bars the way. There’s some interesting stuff here: a guard who can only be seen with the Lens of Truth and needs healing, and the graveyard is apparently watched over by a giant sleeping stalfos. Link wakes up the stalfos and chases him down, which makes the stalfos surrender and leave command of his followers to Link. Each night, Link can approach groups of stalfos in the graveyard, open a grave, complete a puzzle, fight a miniboss, and get a reward. The first day’s miniboss is an iron knuckle, which probably means I’m not supposed to be out here yet because fighting that on 11 hearts is mean. After it’s dead, Flat, one of the royal composer ghosts, comes to Link. He says Sharp sold his soul to the devil, and teaches Link a song that represents his anger and sadness over the betrayal, the Song of Storms.
Okay, now it’s time for Link to put on his black suit and go back to the ranch. I don’t know why the game had Link practice alien hunting with Epona, because it’s frankly easier to put on the bunny hood, follow the dog around on foot, kill all the aliens Link can see, and hold out until the break of dawn. Dawn comes, the aliens all poof, and Romani calls him “little hero” and gives him a bottle of milk, then sneaks back to the house to go to bed before Cremia catches her. Cremia’s making a milk run to Clock Town that night, and invites Link to come along. It’s a good thing he does, because the Gorman Brothers put a fence in her way, forcing her to take less safe paths to town, and then ride after her wagon trying to break her jars of milk. Link keeps them at bay enough to stop all the milk from being destroyed, and Cremia rewards him with a mask that lets him visit the milk bar in town. There doesn’t seem to be much interesting here just yet, but Link can buy a special milk that will leave his magic meter maxed out until he resets time.
Now it’s back to the graveyard, stopping en route to heal the invisible guard and receive his mask. The second night’s puzzle involves the Lens of Truth, and after another iron knuckle fight, Link gets a heart piece. The third night Link helps Dampé summon a poe. This puzzle is terrible, because Dampé is so goddamn stupid. Okay, I get he can only follow the light of the fairy. But if I lose Z-targeting on him, does he keep going the way he was? Stop until Tatl comes back? No, of course not. He wanders off in a “random” direction which always seems to be opposite the way Link was trying to drag him. Oh, and there’s a wall master, and if it catches Link, it resets the puzzle. Summoning and killing the poe rewards a bottle, which is nice.
And then it’s reboot time.
Next: Trespassing on their private pirate property.
Friday, August 24, 2018
Link’s Awakening: Nightmares and Awakening
“We were born of nightmares… To take over this world, we made the Wind Fish sleep endlessly! If the Wind Fish doesn’t wake up, this island will never disappear! We would have been masters of this place… but you had to come here and disrupt our plan!”
So… hrm. The Nightmares mucked with the Wind Fish so it wouldn’t wake up. And Link got drawn into the dream world, so he can’t leave without breaking the Nightmares’ hold on the Wind Fish. Considering only those people, it’s easy: screw the Nightmares, save the Wind Fish, and Link’s free. But what about the other creatures of Koholint? So far they don’t seem to be faring too badly in the Wind Fish’s eternal nightmare-infested dream, but that could change. If it were even possible for Link to get away from the island without waking the Wind Fish, how would things be for them afterward? And what about the next poor sap who gets sucked into Koholint accidentally and may have an even harder time leaving than Link?
All in all, waking the Wind Fish, ending the dream, and returning the other inhabitants of the island to nonexistence is the best thing to do, but… I mean…
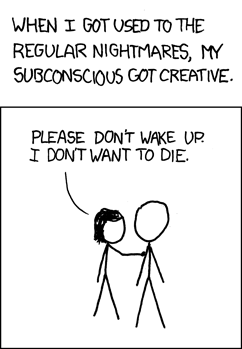
(xkcd “Nightmares” by Randall Munroe. [CC BY-NC 2.5] [More info])
The final Nightmare assumes a number of different forms, most of which are familiar to Link from his previous adventures. First there’s a giant zol, which is not terribly threatening but immune to just about everything except magic powder. Then come echoes of three bosses from A Link to the Past: Agahnim, a giant moldorm, and Ganon. Then there’s a lanmola that dies pretty quickly, and it’s time for the final form, DethI [1].
DethI is yet another eye monster, with two armed with spiked appendages it swings at Link. So, Link has to play the deadliest game of double Dutch ever [2] while finding time to shoot the eye with arrows. Alternately, one shot from the boomerang does the trick too. Either way, the last Nightmare dies.
“This island is going to disappear… Our world is going to disappear… Our world… Our… world…”
Meet the Wind Fish
A staircase appears in front of Link, and he climbs and meets the owl one last time. The owl explains that it’s part of the Wind Fish, thanks Link for helping free the Wind Fish, and says goodbye.
The Wind Fish then arrives with a godawful trilling sound.
“I AM THE WIND FISH… LONG HAS BEEN MY SLUMBER… IN MY DREAMS… AN EGG APPEARED AND WAS SURROUNDED BY AN ISLAND. WITH PEOPLE, ANIMALS, AN ENTIRE WORLD!
“BUT VERILY, IT BE THE NATURE OF DREAMS TO END! WHEN I DOST AWAKEN, KOHOLINT WILL BE GONE… ONLY THE MEMORY OF THIS DREAM LAND WILL EXIST IN THE WAKING WORLD…
“SOMEDAY, THOU MAY RECALL THIS ISLAND… THAT MEMORY MUST BE THE REAL DREAM WORLD…
“COME, Link [3]… LET US AWAKEN TOGETHER!
“PLAY THE EIGHT INSTRUMENTS! PLAY THE SONG OF AWAKENING!”
Link plays the Ballad of the Wind Fish one last time as a montage of the people of Koholint Island fading out of existence plays. Finally the entire island disappears, and Link is blasted by a spray of water, waking to find himself holding on to a small portion of his ship’s mast. The wind fish flies overhead as Link watches with a smile.
And that’s the end. Does Link ever make it back to Hyrule? Does he die alone at sea, clinging to what’s left of his ship and hoping for a rescue that never comes? I would guess we’ll never know, unless Nintendo decides to make another game with this particular Link someday. There is one final bit of closure: If the game’s completed with no deaths, a winged Marin flies over the The End screen, implying somehow she escaped the island as a bird. The DX version is a little more clear: her face appears in the sky while the Ballad of the Wind Fish plays, and then seagulls appear, suggesting that her wish to the Wind Fish was to become a seagull and fly to other places, as she’d told Link during their scene on the beach, and it was granted.
Final Thoughts
So, that’s Link’s Awakening. I ultimately have it behind A Link to the Past, but in some ways it’s better, particularly the story and characters. And who knows, if I’d played this back when it came out, it might have even overtaken the position of my favorite in the series. There are things I find disappointing/annoying/frustrating, but overall it’s a great game, and the fact that something of this scope and quality made it to the Game Boy is absolutely amazing.
[1] That's a capital I, not a lowercase L. I hate this name – it's like the NES Final Fantasy where they had to cram monster and spell names into a small number of characters, except the name doesn't appear in-game anywhere, so why couldn't they just say "Death Eye" or "Death's Eye" or something readable?
[2] “Look, there’s a gerbil. I’m going up and down. 60 Minutes, where are you? Here’s an exposé for you…”
[3] The sudden lowercase letters in the player character’s name are really jarring here [4].
[4] I guess they expected the player character to be called “THIEF” at that point.
So… hrm. The Nightmares mucked with the Wind Fish so it wouldn’t wake up. And Link got drawn into the dream world, so he can’t leave without breaking the Nightmares’ hold on the Wind Fish. Considering only those people, it’s easy: screw the Nightmares, save the Wind Fish, and Link’s free. But what about the other creatures of Koholint? So far they don’t seem to be faring too badly in the Wind Fish’s eternal nightmare-infested dream, but that could change. If it were even possible for Link to get away from the island without waking the Wind Fish, how would things be for them afterward? And what about the next poor sap who gets sucked into Koholint accidentally and may have an even harder time leaving than Link?
All in all, waking the Wind Fish, ending the dream, and returning the other inhabitants of the island to nonexistence is the best thing to do, but… I mean…
(xkcd “Nightmares” by Randall Munroe. [CC BY-NC 2.5] [More info])
The final Nightmare assumes a number of different forms, most of which are familiar to Link from his previous adventures. First there’s a giant zol, which is not terribly threatening but immune to just about everything except magic powder. Then come echoes of three bosses from A Link to the Past: Agahnim, a giant moldorm, and Ganon. Then there’s a lanmola that dies pretty quickly, and it’s time for the final form, DethI [1].
DethI is yet another eye monster, with two armed with spiked appendages it swings at Link. So, Link has to play the deadliest game of double Dutch ever [2] while finding time to shoot the eye with arrows. Alternately, one shot from the boomerang does the trick too. Either way, the last Nightmare dies.
“This island is going to disappear… Our world is going to disappear… Our world… Our… world…”
Meet the Wind Fish
A staircase appears in front of Link, and he climbs and meets the owl one last time. The owl explains that it’s part of the Wind Fish, thanks Link for helping free the Wind Fish, and says goodbye.
The Wind Fish then arrives with a godawful trilling sound.
“I AM THE WIND FISH… LONG HAS BEEN MY SLUMBER… IN MY DREAMS… AN EGG APPEARED AND WAS SURROUNDED BY AN ISLAND. WITH PEOPLE, ANIMALS, AN ENTIRE WORLD!
“BUT VERILY, IT BE THE NATURE OF DREAMS TO END! WHEN I DOST AWAKEN, KOHOLINT WILL BE GONE… ONLY THE MEMORY OF THIS DREAM LAND WILL EXIST IN THE WAKING WORLD…
“SOMEDAY, THOU MAY RECALL THIS ISLAND… THAT MEMORY MUST BE THE REAL DREAM WORLD…
“COME, Link [3]… LET US AWAKEN TOGETHER!
“PLAY THE EIGHT INSTRUMENTS! PLAY THE SONG OF AWAKENING!”
Link plays the Ballad of the Wind Fish one last time as a montage of the people of Koholint Island fading out of existence plays. Finally the entire island disappears, and Link is blasted by a spray of water, waking to find himself holding on to a small portion of his ship’s mast. The wind fish flies overhead as Link watches with a smile.
And that’s the end. Does Link ever make it back to Hyrule? Does he die alone at sea, clinging to what’s left of his ship and hoping for a rescue that never comes? I would guess we’ll never know, unless Nintendo decides to make another game with this particular Link someday. There is one final bit of closure: If the game’s completed with no deaths, a winged Marin flies over the The End screen, implying somehow she escaped the island as a bird. The DX version is a little more clear: her face appears in the sky while the Ballad of the Wind Fish plays, and then seagulls appear, suggesting that her wish to the Wind Fish was to become a seagull and fly to other places, as she’d told Link during their scene on the beach, and it was granted.
Final Thoughts
So, that’s Link’s Awakening. I ultimately have it behind A Link to the Past, but in some ways it’s better, particularly the story and characters. And who knows, if I’d played this back when it came out, it might have even overtaken the position of my favorite in the series. There are things I find disappointing/annoying/frustrating, but overall it’s a great game, and the fact that something of this scope and quality made it to the Game Boy is absolutely amazing.
[1] That's a capital I, not a lowercase L. I hate this name – it's like the NES Final Fantasy where they had to cram monster and spell names into a small number of characters, except the name doesn't appear in-game anywhere, so why couldn't they just say "Death Eye" or "Death's Eye" or something readable?
[2] “Look, there’s a gerbil. I’m going up and down. 60 Minutes, where are you? Here’s an exposé for you…”
[3] The sudden lowercase letters in the player character’s name are really jarring here [4].
[4] I guess they expected the player character to be called “THIEF” at that point.
Thursday, August 23, 2018
Majora's Mask: Snowhead Temple
The main objective for this round is to compete Snowhead Temple, so Link plays the Inverted Song of Time to maximize the amount of time he has to complete the dungeon. Then he soars up to Snowhead, where a wind is blowing from the temple making approach impossible. Tatl sees something in the storm, and suggests Link take a look, and the Lens of Truth reveals the wind’s caused by a giant goron blowing down the path. So Link shifts into goron form and plays the Goron’s Lullaby, which puts the goron to sleep and stops the wind. The goron rolls off the walkway, but I’m sure he’ll be alright, and even if he won’t, he’d have frozen to death anyway. Or died when the moon hit.
Given the name, location, and ambient weather, it’s little surprise that Snowhead Temple is an ice dungeon. Goron form is essential here, pushing heavy blocks, rolling over ramps, smashing down switches too heavy to be bothered by human Link, and in the final puzzle, punching out segments of the central elevator pillar that have it raised so high it’s blocking the entrance to the boss room. Deku Link isn’t so important, but gets to come out and play a few times. New enemies include snowball-tossing eenos and rodents with bombs on their tails that are called real bombchus.
The dungeon’s miniboss is a familiar face that I’m surprised to realize weren’t in Ocarina: wizzrobes. They’ve been reimagined yet again, teleporting between various pads around the room. Fortunately, the dot on the minimap shows where they’re going to be, so it’s just a matter of turning to face them and hitting them with an arrow before they can get their shot off. After the first few shots, the wizzrobe starts adding illusory doubles, but only the real one shows up on the minimap, so it’s really just a minor distraction. There are two of them in the dungeon. One guards the dungeon’s treasure, the fire arrows, which I now understand to be the replacement for the fire rod. The second wizzrobe guards the boss key.
The boss of the dungeon is a masked mechanical monster named Goht, a giant robot bull. (Or maybe goat, but aside from the name, bull seems more appropriate.) It starts the battle frozen in ice, which I would think would present an opportunity – Link could hack away enough of the ice to hit its weak spot for an easy kill – but apparently that wouldn’t be “sporting” or “fair” or “fun” or “worth the man-hours the people at Nintendo put in designing this thing,” so we have to do it the hard way. Link melts the ice with a fire arrow, and Goht takes off running around a track around the room. Link puts on the goron mask and rolls after it. This is a fun fight, having to dodge all the obstacles Goht summons and poke at his legs with the goron ball spikes. One time I caught a ramp and landed on his back and was able to get a few free hits in that way, and I’d guess that’s how it’s supposed to be done. After enough hits, Goht loses control, plows into the central pillar, and is buried in rubble.
Link and Tatl return to the foggy realm where the figures they’re looking to recruit live. Tatl asks what they are, and they reply “guardians.” The stray fairy collection award this time is a doubled magic meter. And, getting there, I was glad to see the giant goron was okay, if a bit confused about what happened to it.
Back down the mountain, the Mountain Village smith’s forge has thawed so he can work on Link’s sword. It costs 100 rupees and is only a temporary improvement, but the smith hints that if he gets gold dust, he can make the sword better permanently. There’s one more thing to do: in the Goron Village, the powder keg shop has thawed as well, so Link can take the test to get certified to use the kegs. That test is to run with a keg down to the Mountain Village and open up the Goron Racetrack. Link does this safely, so he can buy kegs now. He can also run the goron races, and receives gold dust if he wins. That lets him get the second sword upgrade.
While waiting for that to finish, I started farming the takkuri again, which is so much easier, quicker, and safer with the fire arrows. This maxed out Link’s bank account at 5,000 rupees and earned another piece of heart. So from now on I’ll be removing more rupees from the bank than I put in, which will let me use the Clock Town shops to restock on ammunition items. Anyway, I’m pretty sure those powder kegs will blow up the boulder leading to Romani Ranch, so it’s time to find out what the deal is there.
Next: First, last, and only line of defense.
Given the name, location, and ambient weather, it’s little surprise that Snowhead Temple is an ice dungeon. Goron form is essential here, pushing heavy blocks, rolling over ramps, smashing down switches too heavy to be bothered by human Link, and in the final puzzle, punching out segments of the central elevator pillar that have it raised so high it’s blocking the entrance to the boss room. Deku Link isn’t so important, but gets to come out and play a few times. New enemies include snowball-tossing eenos and rodents with bombs on their tails that are called real bombchus.
The dungeon’s miniboss is a familiar face that I’m surprised to realize weren’t in Ocarina: wizzrobes. They’ve been reimagined yet again, teleporting between various pads around the room. Fortunately, the dot on the minimap shows where they’re going to be, so it’s just a matter of turning to face them and hitting them with an arrow before they can get their shot off. After the first few shots, the wizzrobe starts adding illusory doubles, but only the real one shows up on the minimap, so it’s really just a minor distraction. There are two of them in the dungeon. One guards the dungeon’s treasure, the fire arrows, which I now understand to be the replacement for the fire rod. The second wizzrobe guards the boss key.
The boss of the dungeon is a masked mechanical monster named Goht, a giant robot bull. (Or maybe goat, but aside from the name, bull seems more appropriate.) It starts the battle frozen in ice, which I would think would present an opportunity – Link could hack away enough of the ice to hit its weak spot for an easy kill – but apparently that wouldn’t be “sporting” or “fair” or “fun” or “worth the man-hours the people at Nintendo put in designing this thing,” so we have to do it the hard way. Link melts the ice with a fire arrow, and Goht takes off running around a track around the room. Link puts on the goron mask and rolls after it. This is a fun fight, having to dodge all the obstacles Goht summons and poke at his legs with the goron ball spikes. One time I caught a ramp and landed on his back and was able to get a few free hits in that way, and I’d guess that’s how it’s supposed to be done. After enough hits, Goht loses control, plows into the central pillar, and is buried in rubble.
Link and Tatl return to the foggy realm where the figures they’re looking to recruit live. Tatl asks what they are, and they reply “guardians.” The stray fairy collection award this time is a doubled magic meter. And, getting there, I was glad to see the giant goron was okay, if a bit confused about what happened to it.
Back down the mountain, the Mountain Village smith’s forge has thawed so he can work on Link’s sword. It costs 100 rupees and is only a temporary improvement, but the smith hints that if he gets gold dust, he can make the sword better permanently. There’s one more thing to do: in the Goron Village, the powder keg shop has thawed as well, so Link can take the test to get certified to use the kegs. That test is to run with a keg down to the Mountain Village and open up the Goron Racetrack. Link does this safely, so he can buy kegs now. He can also run the goron races, and receives gold dust if he wins. That lets him get the second sword upgrade.
While waiting for that to finish, I started farming the takkuri again, which is so much easier, quicker, and safer with the fire arrows. This maxed out Link’s bank account at 5,000 rupees and earned another piece of heart. So from now on I’ll be removing more rupees from the bank than I put in, which will let me use the Clock Town shops to restock on ammunition items. Anyway, I’m pretty sure those powder kegs will blow up the boulder leading to Romani Ranch, so it’s time to find out what the deal is there.
Next: First, last, and only line of defense.
Wednesday, August 22, 2018
Link’s Awakening: Turtle Rock
Turtle Rock
At the far edge of the map lies the entrance to Turtle Rock. There’s no key nor quake medallion to open the way forward, so Link has to do what’s been hinted: play the song to make the turtle come to life. The turtle turns hostile, so it’s a miniboss fight to get into the dungeon. Not a particularly tough one, though, so the way opens fairly easily. In addition to having a turtle head creature petrified on top of the entrance, the dungeon’s floorplan resembles a turtle, too.
This is the final real dungeon, so it pulls out all the stops. Five of the old dungeons’ minibosses return here, the exceptions being Master Stalfos, whom Link had to fight four times; the gohmas; and the Grim Creeper, who was also sort of the dungeon’s end boss. Vires show up for the first time since the first game, and they’re considerably more dangerous now, hiding along the edges of the screen and spitting fire at Link. The dodongo snakes are particularly memorable, because to get the chest they drop, Link has to exit and re-enter the dungeon – grabbing the last heart piece along the way – coming back on an elevated walkway, and has to defeat the snakes by throwing bombs at them from above.
The dungeon’s actual miniboss is Blaino, a boxer whose gloves also provide a strong defense against Link’s sword attacks. He’s got a wind-up punch that will send Link flying back to the start of the dungeon if it hits, but if it misses it leaves him vulnerable for a second. Also, his defense doesn’t protect against spin attacks, so that’s the best way to get rid of him. Once Blaino is defeated, a passage opens to the dungeon’s treasure, the magic rod, which since it comes with the magic book capability from the start, also resembles A Link to the Past’s fire rod. This is quite useful against some enemies, such as the vires. It’s also needed to destroy some icy blocks in the side-scrolling areas that block passage to the Nightmare.
The dungeon also has a unique type of puzzle: moving platforms that give some kind of reward if they can be manipulated to cover the entire open area in the room. This finally led to me having a breakdown when my thumb was killing me and the damned D-pad wasn’t responding properly to my commands trying to get the platform to turn. The controller I had been using has been a loyal friend for 13 years, but my poor thumb finally said enough.
The dungeon’s Nightmare is Hot Head, a fireball that hops around the lava pit and throws fire at Link. Counterintuitively, his weakness is the magic rod’s fireballs, which stop him moving for a second, which means if Link can keep a steady stream of fireballs thrown at him, it’s going to be a short and ridiculous fight. Hot Head asks Link why he had to come disrupt the Nightmares’ plan and force everything to change, before falling into the same “you too are in the dream” routine the previous two Nightmares had used.
Finally, Link claims the Thunder Drum, the final Instrument, and the voice tells him it’s time to visit the egg on the mountain.
The Wind Fish’s Egg
Before he can do that, however, Link has to visit Mabe Village’s library. There’s a book there that can only be read with the magnifying glass, which explains the route Link needs to take inside the Egg’s maze. Also, coming down from the mountain, there’s one final owl statue.
“MUSIC, THE FISH STIRS IN THE EGG YOU ARE THERE…”
At last, it’s time to awaken the sleeper. As Link approaches the egg, the owl returns one more time, reminding Link everything we already know; this scene was probably meant for if Link went to the egg before he was ready to open it. Link approaches the egg and plays the Ballad of the Wind Fish on the ocarina, and is soon joined by the eight Instruments for a larger serenade. Instead of waking the Wind Fish, it merely cracks a hole in the egg. With encouragement from the owl, Link enters the egg.
The inside of the egg looks like a dungeon, but Link falls to the lower floor, which is a bunch of identical rooms with passages in all four cardinal directions. If Link follows the directions from the book in the library, he comes to another pit and jumps down to confront the final boss.
Next: Verily, it be the nature of dreams to end.
At the far edge of the map lies the entrance to Turtle Rock. There’s no key nor quake medallion to open the way forward, so Link has to do what’s been hinted: play the song to make the turtle come to life. The turtle turns hostile, so it’s a miniboss fight to get into the dungeon. Not a particularly tough one, though, so the way opens fairly easily. In addition to having a turtle head creature petrified on top of the entrance, the dungeon’s floorplan resembles a turtle, too.
This is the final real dungeon, so it pulls out all the stops. Five of the old dungeons’ minibosses return here, the exceptions being Master Stalfos, whom Link had to fight four times; the gohmas; and the Grim Creeper, who was also sort of the dungeon’s end boss. Vires show up for the first time since the first game, and they’re considerably more dangerous now, hiding along the edges of the screen and spitting fire at Link. The dodongo snakes are particularly memorable, because to get the chest they drop, Link has to exit and re-enter the dungeon – grabbing the last heart piece along the way – coming back on an elevated walkway, and has to defeat the snakes by throwing bombs at them from above.
The dungeon’s actual miniboss is Blaino, a boxer whose gloves also provide a strong defense against Link’s sword attacks. He’s got a wind-up punch that will send Link flying back to the start of the dungeon if it hits, but if it misses it leaves him vulnerable for a second. Also, his defense doesn’t protect against spin attacks, so that’s the best way to get rid of him. Once Blaino is defeated, a passage opens to the dungeon’s treasure, the magic rod, which since it comes with the magic book capability from the start, also resembles A Link to the Past’s fire rod. This is quite useful against some enemies, such as the vires. It’s also needed to destroy some icy blocks in the side-scrolling areas that block passage to the Nightmare.
The dungeon also has a unique type of puzzle: moving platforms that give some kind of reward if they can be manipulated to cover the entire open area in the room. This finally led to me having a breakdown when my thumb was killing me and the damned D-pad wasn’t responding properly to my commands trying to get the platform to turn. The controller I had been using has been a loyal friend for 13 years, but my poor thumb finally said enough.
The dungeon’s Nightmare is Hot Head, a fireball that hops around the lava pit and throws fire at Link. Counterintuitively, his weakness is the magic rod’s fireballs, which stop him moving for a second, which means if Link can keep a steady stream of fireballs thrown at him, it’s going to be a short and ridiculous fight. Hot Head asks Link why he had to come disrupt the Nightmares’ plan and force everything to change, before falling into the same “you too are in the dream” routine the previous two Nightmares had used.
Finally, Link claims the Thunder Drum, the final Instrument, and the voice tells him it’s time to visit the egg on the mountain.
The Wind Fish’s Egg
Before he can do that, however, Link has to visit Mabe Village’s library. There’s a book there that can only be read with the magnifying glass, which explains the route Link needs to take inside the Egg’s maze. Also, coming down from the mountain, there’s one final owl statue.
“MUSIC, THE FISH STIRS IN THE EGG YOU ARE THERE…”
At last, it’s time to awaken the sleeper. As Link approaches the egg, the owl returns one more time, reminding Link everything we already know; this scene was probably meant for if Link went to the egg before he was ready to open it. Link approaches the egg and plays the Ballad of the Wind Fish on the ocarina, and is soon joined by the eight Instruments for a larger serenade. Instead of waking the Wind Fish, it merely cracks a hole in the egg. With encouragement from the owl, Link enters the egg.
The inside of the egg looks like a dungeon, but Link falls to the lower floor, which is a bunch of identical rooms with passages in all four cardinal directions. If Link follows the directions from the book in the library, he comes to another pit and jumps down to confront the final boss.
Next: Verily, it be the nature of dreams to end.
Subscribe to:
Posts (Atom)